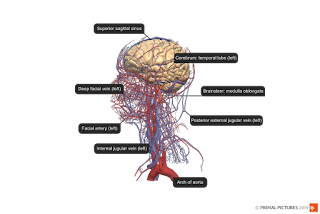
Anatomy.TV's 3D Real Time offers a lot of exciting possibilities. It consists of a flexible 3D anatomy atlas that allows users to select and view arteries, veins, muscles, ligaments, bones, and organs, individually or with surrounding structures for context. Users can customise their models with labels, pins, and drawings, and save the custom image for later use or reference.
Please Note: Unfortunately, 3D Real Time does not work on Chrome. To properly access this section of Anatomy.TV, please use a different browser, such as Firefox, Internet Explorer, Opera, or Safari. All other components of Anatomy.TV can be accessed via Google Chrome or the above browsers.
 Viewpane Controls:
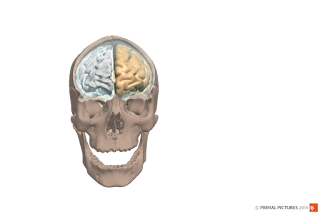
At the bottom of the screen, there are 8 viewing options. Each of these offers a different way to interact with the model. TIP: check out the Examine button - this allows you to select a structure and view it within the context of its surrounding anatomy by ghosting all of the other structures and leaving only the selected structure opaque. See picture to the left for an example!
For more information on the other viewpane controls, take a look at the point and click tutorial home page and watch the video tutorials provided.
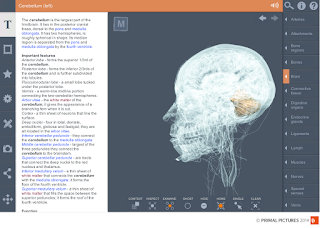
Viewing Structure Text:
To view information on a particular structure, simply click the structure and then click the Structure Text button. This will open a pane beside your image that describes the selected structure and links to related structures (see image above). For more information on this tool, see the Structure Text point and click tutorial or watch the video tutorial The text panel and text links.
Customising the image:
You can add labels to the 3D model by clicking on the customisation tools panel. Simply click on the add label button and select the structure you wish to label.
This section also allows you to add pins to the model or to draw on the image.
TIP: You can save the image at any time as you work, allowing you to save different versions of the same structure. This could be useful in preparing illustrations for assignments or presentations!
For more information on how to customize the model, see the customization tools panel point and click tutorial and watch the video tutorials provided.
3D Mode:
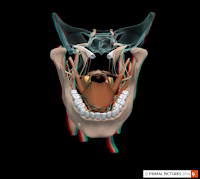
The 3D stereo anaglyph mode can be used in conjunction with 3D glasses (available from library front desk, limited supply so get in quick!), to view the model with stereoscopic effect. To learn more about this feature and how to activate it, see the video tutorial, using 3D stereo-anaglyph mode.
Previous Post: Anatomy TV – Overview
Next Post: Anatomy TV – 3D Human Atlas
Please Note: Unfortunately, 3D Real Time does not work on Chrome. To properly access this section of Anatomy.TV, please use a different browser, such as Firefox, Internet Explorer, Opera, or Safari. All other components of Anatomy.TV can be accessed via Google Chrome or the above browsers.
 Viewpane Controls:
 At the bottom of the screen, there are 8 viewing options. Each of these offers a different way to interact with the model. TIP: check out the Examine button - this allows you to select a structure and view it within the context of its surrounding anatomy by ghosting all of the other structures and leaving only the selected structure opaque. See picture to the left for an example!
For more information on the other viewpane controls, take a look at the point and click tutorial home page and watch the video tutorials provided.

Viewing Structure Text:
To view information on a particular structure, simply click the structure and then click the Structure Text button. This will open a pane beside your image that describes the selected structure and links to related structures (see image above). For more information on this tool, see the Structure Text point and click tutorial or watch the video tutorial The text panel and text links.

Customising the image:
You can add labels to the 3D model by clicking on the customisation tools panel. Simply click on the add label button and select the structure you wish to label.
This section also allows you to add pins to the model or to draw on the image.
TIP: You can save the image at any time as you work, allowing you to save different versions of the same structure. This could be useful in preparing illustrations for assignments or presentations!
For more information on how to customize the model, see the customization tools panel point and click tutorial and watch the video tutorials provided.
3D Mode:

The 3D stereo anaglyph mode can be used in conjunction with 3D glasses (available from library front desk, limited supply so get in quick!), to view the model with stereoscopic effect. To learn more about this feature and how to activate it, see the video tutorial, using 3D stereo-anaglyph mode.
Previous Post: Anatomy TV – Overview
Next Post: Anatomy TV – 3D Human Atlas
Comments